
NES Ports Part 1
Over the course of porting several NES games, it became apparent that I would be solving the same problem multiple times. And, because I’m lazy, I didn’t want to remember how I did those problems. For this reason I’ve created a template that has all the base pieces that I need for porting an NES game. This blog post will go through the pieces at a high level, and talk about where they’re used and why I’ve set them up the way that I have.
The Template Project
The template project itself is available here:
https://github.com/rumbleminze/nes-to-snes-template
Feel free to clone this project as a start to your own NES conversion, and if you find it useful, feel free to contribute back to improve the template.
How I structure my MMC1 and UNROM NES Ports
The MMC1 is a popular mapper, which provided bank switching capabilites to the NES. Most of the ports that I’ve done use the MMC1 or a similar mapper.
You can think of a “bank” of the nes rom as a section of program code or other game data. An MMC1 rom would usually have 8 banks of program rom, and some games would additionally have up to 8 banks of CHR rom, which holds graphics data.
For Program banks, most MMC1 games (at least that I’ve seen and ported) use the mapper in this way:
- Banks 0 through 6 are switchable to be located at $8000-$BFFF
- Bank 7 is fixed at $C000
You can picture this in this way:
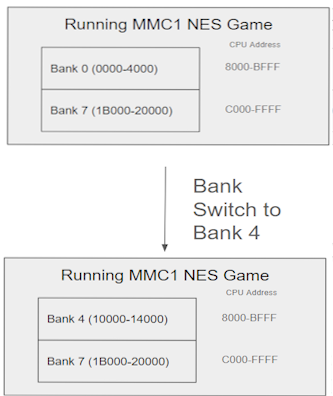
Since the bank switch subroutine is (I assume) always in the fixed bank, an NES game can swap out the other bank and then go do stuff using that part of the program logic.
Since we don’t have any bank switching capabilities on the SNES, we have to fake it. Luckily, what we do have is big wide open space. More memory than we possibly know what to do with!
We fake this capability by creating 7 banks of program logic, and copying the 8th fixed bank to the end of each of the 7 banks:
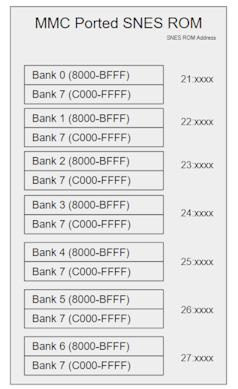
Note that we use banks 21:0000 to 27:0000 for our ported banks, because those banks will be mirrored into A1 - A7, which are FastROM banks, giving us a free speed up.
Now we can simulate bank switching by jumping to the appropriate bank. So, if we were executing code at 21:a122 and we came to an instruction to swap to bank 6, we’d jump over to 27:xxxx, and bank 6 would be in our 8000 - BFFF range.
Here’s a preview of what that code looks like, but I’ll talk more in depth about it next time:
; Bank Switches to the Bank in the X register
@bank_switch_to_x:
    PHA									; Store A so we don't lose it
    TXA									; X holds our bank, move it to A
    INC A								; Calculate the bank to jump to
    AND #$0F							; by (A + 1) OR #$A0.
    ORA #$A0							; Remember bank 0 NES is in bank A1
    STA BANK_SWITCH_DB					; store that in a work ram byte
    PHA									; push it to the stack, then pull it as the DB
    PLB									;
    LDA #.lobyte(@bank_switch_jump)		; store the low and high bytes of the label below
    STA BANK_SWITCH_LB					; in the appropriate work ram bytes
    LDA #.hibyte(@bank_switch_jump)
    STA BANK_SWITCH_HB

    JML (BANK_SWITCH_LB)				; JuMp Long to the target, we should end up at the
										; PLA below, but in the appropriate target bank
    @bank_switch_jump:
    PLA									; Pull our stored A
    RTS
If you want to read more indepth on what the different mappers are and what they can do, check out the nes dev wiki: https://www.nesdev.org/wiki/Mapper
How our ROM is structured
Before we take a look how we break up the rom into banks, let’s take a look at our .cfg file that is used by cc65 to compile the game.
At the start of the file is some standard stuff, defining a lot of unused space:
ROM0:       start =   $0000,    size = $10000, fill = yes, type = rw;
EMPTY_SPACE:   start = $010000,      size = $1F0000, fill = yes;
Next up, we define the bank where I put all of my own SNES specific code, this is placed in bank 20:0000, which as noted above will be used at A0:0000:
SRAM0:      start = $200000,    size = $8000, type = rw, fill = yes;
ROM1:       start = $208000,    size = $8000, fill = yes;
Next up are a series of triplets, one for each NES code bank:
SRAM1:     start = $210000, size = $8000, type = rw, fill = yes, fillval = 1;
PRGA1:     start = $218000, size = $4000, fill = yes;
PRGA1C:    start = $21C000, size = $4000, fill = yes;
Finally, I’ll note that we have the CHR ROM banks from A8-AF, and a few other banks that I ended up using for various things. Note that the CHR ROM banks DO NOT clone the fixed bank from the NES, as those are read only, and we’ll be doing something else with those!
The Segments part of the config file should be fairly straightforward, we’re essentially just laying out our rom as I have described. Some important segments for SNES games:
CODE:       load = ROM0,         start = $00FE00;
HEADER:     load = ROM0,         start = $00FFC0;
ROMSPEC:    load = ROM0,         start = $00FFD5;
VECTOR:     load = ROM0,         start = $00FFE0;
You shouldn’t need to adjust these.
Parsing The NES ROM into Bank Specific .asm Files
In the /utilities folder of the template is a go file that will take a 256kB NES game, and split it into 16 separate 16 kB files. The go script does this in a somewhat specific way to prep the files for my style of porting.
You should be able to run the script by running:
go run parseNesFileToBanks.go
This will result in 16 files being created:
bank[0-7].asm - these are the program rom banks
chrom-tiles-[0-7] - these are 8kB bank files that contain the tiles from 4kB worth of NES tile data.

Note that the tile data takes up twice as much room in the SNES rom as the NES because we reformat the tiles from the NES’s 2bpp format to the SNES’s 4bpp format. This saves us from having to convert it in code later.
Getting it all up and running
Now that we have our bank files created, we’ll copy them to the /src directory. At this point I could build the game, although nothing is hooked up to actually run. What we can do is take a look at the tiles that we’ve loaded to make sure things look right:

Next time!
Now that we’ve got a game the compiles, it’s time to actually start doing conversion stuff. In the next blog post I’ll talk more in depth about the differences between the SNES and NES, and the subroutines that I’ve built to deal with those differences.
If you want to see the Double Dragon port in the state when this blog post was made, you can check out the part-1 branch here:
https://github.com/rumbleminze/double-dragon-snes/tree/part-1